 |
Audio Asylum Thread Printer Get a view of an entire thread on one page |
For Sale Ads |
|
|
Audio Asylum Thread Printer Get a view of an entire thread on one page |
For Sale Ads |
131.191.158.45
Hello all.
I'm at a point where I know room treatment (should) be the next upgrade to my system, as I know it'll make a more noticeable improvement in sound quality than an upgrade anywhere in my musical chain.
I know this but...
I always have such a hard time actually pulling the trigger on it. I research it, ask questions, figure out the cost (about 1K for me) and get really, really close to actually buying, but always pull back. I've spoken to Frank at GIK (which is the ONLY room treatment I can afford) and he's recommended tri-traps floor to ceiling, along with 244's on the front wall and first reflection points from the speakers.
It all makes sense.
But, to me, a grand is a crapload of money, and I've routinely end up chickening out. I am, however, getting closer to a purchase.
So before I make the financial commitment, my question to you is this: Has anyone treated a room and been disappointed?
Thanks.
'Dwebe
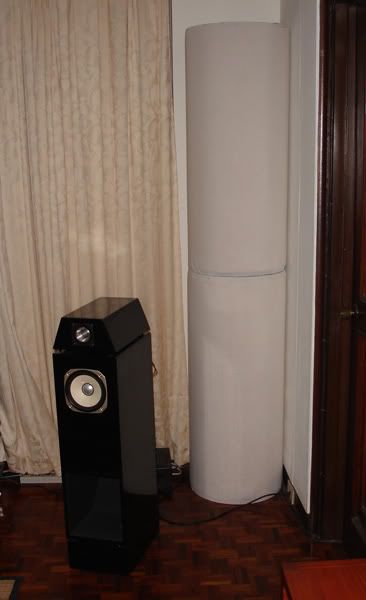
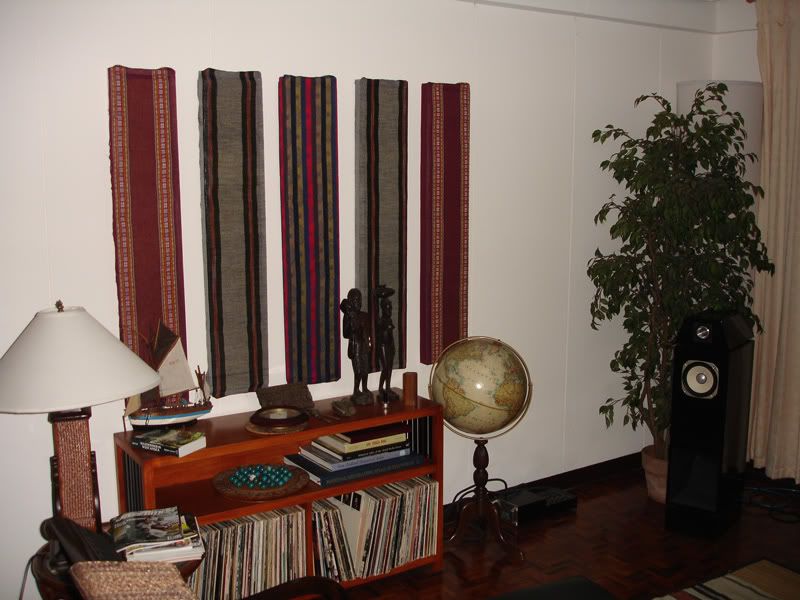
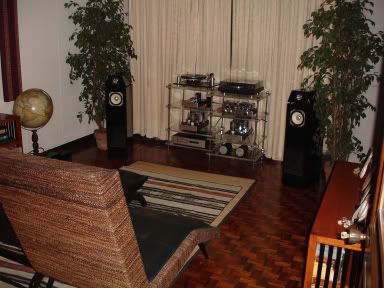
BTW, here's a few images of my room:
Follow Ups:

This used to be my room, and I could change it back this way if needed. Would this be an easier set-up to work with? I would rather keep it as is, as I rather like that look better. But if one way is a difficult treatment and the other way is better, I'll opt for the better sound.
The room in this photo is essentially turned 90 degrees to the left of the current one.
nt
As stated to Mr. Aiken, I'm looking to get the best soundstage my room/equipment will allow. And I figured treating the room has got to be priority number one, the one that'll make the biggest difference over upgrading any equipment.
You say "room treatment" as if it means doing a particular thing but it doesn't. There are different ways to treat a room and they can and do result in very different types of presentation of the sound. It is possible to end up with a result that is not the sort of sound you like, simply because you chose the wrong treatment approach.
It's hard to go wrong with bass traps in the room corners. They smooth modal response and shorten reverberation time, both of which are almost always going to be very positive results.
When it comes to treating first reflection points and adding additional absorption or using diffusion in the room, you start to change the sound in ways that don't always please people. It's possible to either increase or decrease the strength of attributes such as the soundstage and imaging, and to modify tonal response. Some people like imaging and some don't. Some like one sort of tonal characteristic and some don't. Treat the room in a way that promotes the things you like and you'll be happy. Treat it in a way that promotes things you don't like and you'll think it's a disaster.
Be very clear about what kind of outcomes you want before you start and then design your treatment to deliver the sort of outcome you want and I have no doubt you'll be happy. Don't do that and you may be lucky or you may not be lucky. You'll simply find out the hard way.
David Aiken
I am looking to get the widest, deepest and tallest soundstage my room/system will allow while maintaining image precision.
Yep, that'd be about it.
I hope "dream on" didn't enter your mind when reading the above.
Cheers.
Then I would recommend the following things:
1- make the setup (speaker location, listening position) as symmetrical as possible within the room. Also take a look at the Audio Physic speaker setup method in the FAQ and experiment with the ideas in that document, especially maximising the difference in length between the direct sound path and the first reflection sound paths by placing speakers and listening position some distance from the walls. That's easier in large rooms than in small rooms but read the document several times and then start experimenting with the approach described in it. Like all setup documents it assumes a symmetrical room but you can apply the same principles of keeping the direct path short relative to the length of the first reflection paths in asymmetrical rooms and that, on it's own, will help to reduce the soundstage and imaging anomalies that occur in such rooms.
2- keep a clear space around each speaker for at least 3 to 4 feet if possible, more is better.
3- clear anything that you don't regard as necessary out of the room in order to minimise the objects that can create unpaired reflections.
Then to treatment:
- bass traps in corners,
- absorption at side wall and front wall (behind the speaker) reflection points. There is some evidence that some/most people prefer no absorption at the side wall points but I definitely prefer absorption there. If you opt for absorption you may also want to try treating the opposite wall first reflection point for each speaker�this can be done by using a wider panel on each side or adding a second panel on each side a little closer to you than the panels for the same wall first reflection points.
- either absorption or diffusion at rear wall reflection points. In a small room I'd go for absorption because you want at least 10' or so between you and a diffuser if it's going to work optimally for you.
- since height of soundstage is important to you I'd also consider absorption at ceiling first reflection points which is something I haven't tried yet since I don't want to have to drill into the ceiling to mount anything.
The absorption used should be good quality, broad band absorption and the material used at first reflection points should not have a limp membrane facing the room. Limp membranes improve bass absorption but also reduce mid and high frequency absorption by reflecting those frequencies back into the room. At first reflection points absorption of mid and high frequencies is more important than a bit more bass absorption.
If you want to understand a bit about these recommendations, then read Floyd Toole's recent book "Sound Reproduction". He explains how these absorption locations improve imaging.
If you have a room with left/right asymmetry or the speakers are different distances from the side walls, then you're probably going to have to do some experimentation in order to eliminate the pull of the centre image to one side that usually occurs as a result of asymmetrical side reflections. I've never seen a nice, neat set of rules for dealing with asymmetry but you can get there with experimentation. I know that because I have an L-shaped room and I've got there.
I'd also confine the use of absorption to bass traps in corners and treatment of the first reflection points mentioned, plus a floor rug between you and the speakers if you have a hard, reflective floor. Keeping the rest of the room reflective helps keep the sound dynamically lively in my view. Provided the absorption used is broad band with a relatively smooth absorption spectrum you should not have to worry about making the sound tonally dead since broad band absorption should have minimal effect on the tonal balance of the reflected sound. If you use absorption which is not broad band, such as fairly thin foam, you tend to end up with the absorption skewed towards the high frequencies and upper mids, and not enough absorption at lower frequencies to keep the reflected sound tonally neutral. The effect of that is dead sound and many people cite that kind of experience as proof that acoustic treatment is not a good idea. There's a big difference in quality of results between using absorption properly and not using it properly, and you don't want to not use it properly because you won't like the sound you'll get as a result.
David Aiken
When I first went down this route, I had no idea how much difference a few simple treatments would make. I didn't start out with any hugely glaring problems, just a relatively bare room that was too reflective and bright sounding. I read all of Jon Risch's posts, and Ethan Winer's site, then a few others including the the Teres site.For space and aesthetic reasons I decided on 18" x 6' tube traps in the front corners and a series of narrow absorption panels on the side walls. The difference in sound quality was dramatic - treating the first reflection points smoothed everything out, and the tube traps made the room less boomy, resulting in greater clarity and a perceived increase in resolution.
For the tube traps, I used pipe insulation and followed the very clear instructions on the Teres site (linked). I have no doubt other materials could be more effective, but this method is quick, easy, cheap, and works. Half of the length is stuffed longitudinally with the left-over panel material in an X shape to (in theory) increase mass and provide broader-band absorption. By the way, contrary to a post below, these must be capped, they don't work if the ends are left open:
For wall panels I used 2" compressed fiberglass panels and wrapped them to please my better half. Rather than use the typical 2' wide sections I made several narrow ones in the theory (hope?) that multiple edges would increase diffusion. These made a really noticeable improvement in imaging:
Finally, to reduce visual impact and maybe add a little more diffusion, I added a couple of ficus trees. These made no noticeable audible difference but stay for the visual effect
By the way, my total outlay was about $200 (materials are expensive where I live) and one weekend of effort. I'm sure the results can be improved, but this stuff is easy and cheap enough for an experiment
Edits: 10/13/09 10/13/09
Those look quite nice. Thanks for the photos, and the link.
Given a horrendous listening room acoustics situation (are there many that don't need some attention?), and not feeling so comfortable with the costs of professionally built solutions, I finally DIY'ed my own panel absorbers. I haven't done any formal measurements, but qualitatively the panels have transformed the room acoustics, and in turn the sonic performance of my system at the listening position (walk to some other part of the room and all bets are off).I made 2'x4' and 2'x2' wooden framed things with SAFB being the main effective material. Lightweight frames made from firring strips just stapled together, some polyester batting, SAFB, burlap of different colors, and some wall hooks. I estimate that the direct materials cost of each panel is less than $15. I used just one 2" thick bit of SAFB per panel, mounting them off the walls by about 2". They're similar to what's shown in the video. Once I had a plan, sourcing the materials, preparing the materials, and assembly was pretty quick and easy. Overall, not difficult.
Most of these are placed along walls. I have some straddling corners, but I need to do more to tame corners and to address lower frequencies. I think the finish looks quite professional. The finished appearance quality is mostly a matter or how much effort and care is applied to the finishing work.
- SJ
Edits: 10/13/09
Thanks for the suggestion to use SAFB (had to look that one up). Do you feel it works as well as fiberglass, or better?
Sorry about that. SAFB = Sound Attenuating Fire Bat. Used for acoustic attenuation, thermal insulation, and fire retardance (or so I think). Spun basalt (SAFB) vs. silica (fiberglass). From the attenuation numbers I've seen, similar densities of fiberglass and SAFB are very similar. The SAFB is less pricey than the glass fiber. I bought a box of six 2"x2'x4" bats from ATS Acoustics (atsacoustics.com). I've since come across a source for a greater selection of SAFB; differing densities, shapes, and sizes, which could be useful. I sourced the hardware from Lowe's and Home Depot. The polyester batting and burlap from a local fabric/sewing shop.The results were that without the treatments otherwise nice audio gear sounded all too close to a clock radio (and not even a fancy one, either), but with the treatments satisfying audio experiences abounded. The room overall is now very quiet and much less reflective. There's more to all of this room treatment stuff, but at the listening position there's more sound from the system than the room.
For a bit more background, I'm listening "near-field", in either an equilateral triangle or an equal-legged "T" configuration, with the listener not further than about 8' from the speaker baffles/drivers. My intent here is to minimize room effect at the listening position.
Here's a picture (sorry it's not better) of some of them positioned on the wall. Kinda like a modern art installation... ;)

Thin firring strips, stapled together as I mentioned. The panels are open at the back and the sides to help (I'm guessin') absorb acoustic energy through these parts of the panel. It would be nice to add a little fill to the back sections, then finish this with some fabric. What you see in the back is polyester batting. There's no exposed SAFB. It's all enclosed in some thickness of polyester batting. Here's the unfinished back of a panel.

I've got some thoughts about better corner traps, but haven't gotten around to them yet. If it would help, I have some construction pictures I could send that show how I put together these panels. Nothing too different from what others have done.
- SJ
Edits: 10/13/09 10/13/09
Nice traps SJ. What is the purpose of the polyester batting behind the absorption panels?
Also, where did you get those super-cool CD towers?
The polyester batting is about retaining/securing the SAFB/rock/mineral wool. The SAFB batting is wrapped in the polyester. The firring strip frame is flat, so the SAFB sits on top of it, not inside it, as with some panel designs. The polyester keeps the batting in place and stops direct exposure to the SAFB, keeping the SAFB fibers inside the polyester wrap.
Those CD towers came along with my lovely girlfriend. I'm not sure where she got them.
I don't have a website describing how to build these, nor do I have a formal recipe prepared, but on recent requests I did put something together. If you'd like this, I'd be happy to email it to you. Just drop me an email through the Asylum.
- SJ
Thanks for the information and photos. Your panels look very nice. You mentioned another source with a better selection; do you have a web page for them? As for the photos, the more the merrier. Could you please post them here in case others want to try and DIY the absorbers?
Thanks again.
I don't have a website describing how to build these, nor do I have a formal recipe prepared, but on recent requests I did put something together. If you, or anyone else, would like this, I'd be happy to email it to you. Just drop me an email through the Asylum.
- SJ
SJ- sent you an email.
and a way you can do this a little bit at a time: 1. Sonex (juniors, I think, are the cheapest...you can get them through Sonex or Audio Advisor...roughly $60-70 or so for a box of four, 2 feet by 2 feet)and 2. "Corner Tunes"...these are triangular shaped foam "pillows" that you can place in corners. They are actually quite inexpensive and treat both the "horn effect" of corners and bass anomalies.
As I said, you can start very small and buy more if these work for you.
Good luck
Great timing! I just built floor-to-ceiling (10' tall) flat-panel bass traps for the front corners of my room TODAY after several rounds of going back and forth on the whole thing just like you.
My very preliminary perception is that it is a great improvement with one exception: I was quite disappointed in the loss of perceived dynamics and "life" of the sound at first listen, but raising the crossover point (significantly) on my REL Stadium III sub-base system restored most of the life back into the system without undoing the benefits of the traps. Now I have much less mid-bass bloat so the sound is much cleaner, detail is greatly improved across the board, and soundstaging is deeper. Be prepared for a big change in the sound of your system and plan on doing a good bit of work optimizing your system setup to get it to sound right.
You should be able to build four floor-to-ceiling 24" wide 4" thick OC 705 traps for about $650 total cost. The 705 will run you about $400 of that and the rest is for wood to make a frame and fabric to cover them front and back (different fabric).
I did find that it takes a good deal longer than many would have you believe to do a nice job. Spent about 10 hours so far (not including shopping at HD and Hobby Lobby for ingredients and picking up the fiberglass) and I am only half done. Rear corners are next. The good news is that each successive panels goes faster as you come up the learning curve.
Unless you want to absorb mid and upper frequencies, the front 2" thick panel should be the 705 FRK (faced with a foil/paper layer) and the rear 2" thick panel non-faced. Also, cover the front with a thin layer of plastic (painter's drop cloth). It improves the bass absorption (and reflects higher non-bass frequencies) according to Ethan Winer. He has done tons of research on all the configurations and is extremely knowledgeable and helpful.
If you are not up to the DIY route, Ethan (RealTraps) makes excellent products and they will certainly look better than the DIY versions, although mine turned out nicely.
See link below for a video on an easy way to make these traps.
What a cool and informative video. Looks easy enough. Thank you.
Those are very nice looking traps for a DIY project. Pretty easy to build and finish so they look nice. For those that would prefer a round trap for corners (I can't straddle panels in a corner - a round or even a triangular trap works better in my corners) these might be a more suitable design. There are a couple of caveats though. Some pro's suggest capping them isn't a good idea. And there doesn't seem to be a consensus on whether to stuff them with more insulation or not.
Bryan
Wow! That, too, looks way easy. I'm gonna have to try the DIY approach, it seems.
Thanks.
Jon Risch says that the density of this pipe insualtion, and the fact that it is chemically treated to hold it's shape, makes for a poor bass trap.
Yes, I use a bunch of 'em, but I get very neutral results using eight 18"x36" behind the speakers and four 14"x36" midway in the room. What finally helped my decision was this positive report by inmate Barry Diament who is a professional mastering / recording engineer. Counter to the standard recommendation of placing them in every corner, I found that putting ALL the big ones behind the speakers was more effective. Perhaps that is because I have dipoles.
I used wooden cake pans as the caps and sourced the spandex from the local Hancocks Fabric store. There are pics in my gallery. I am thoroughly delighted with what they do for my room.
rw
Oh...
You have an odd room with the alcoves. Might be a benefit since the dimensions are not symmetrical. Have you experimented much with speaker placement? It almost looks like the speakers are placed more by how you like the looks of them with the alcove compared to position for best sound. And they look quite far apart too. More than 7'? I found by using Jim Smith's book Get Better Sound and the tip of moving the speakers closer together than you'd think really sounds fantastic. Just energizes the room with a wall of 3-D sound. Farther apart sounds OK, but nearly as good and I wouldn't have known it if I didn't try.
I'm surprised that you'd get a recommendation for treating the side wall reflections with your setup. The right channel is really far from the side wall. And the left channel is somewhat far away too. Is he recommended using stands or wall mounting? Bass traps like the Tri's sound like a no brainer. You might want to look at the new Mega traps from Real Trap's too. Not that expensive. And the measurements for Sabins look off the charts. But it would cost you $1k just for 4 of them. I'm kind of leaning towards them over the GIK Tri's or Elite Pillars.
Anyway, in my mind speaker placement is the most important thing. With my setup, it sounds so good without treatment I'm not rushing in to room treatment. But I also know if it's done right there will be some nice improvements taking the sound up a good notch further and probably better than any other electronic upgrades will do. I'm going to start with bass trapping first, from either Real Traps or GIK, because it's the easiest thing to do with no risk of getting wrong or wasting money.
The speakers are around 7-8 feet apart, but they're Dunlavy's, which are supposed to be spaced further apart than normal (whatever that is) speakers. I had them placed along the long wall, about 14 feet apart, but due to an angry kitty issue, I had to pull back, scrub, clean, rip apart and somewhat destroy certain portions of the carpet which are now covered by the record racks. What the photo doesn't show is I've got another rack, about 3 feet high (the Ikea kind that stands about 5 ft by 3 ft laid on its side x 2).
The side traps Frank recommended would be placed almost immediately besides the speakers.
I might mess aroud with speaker placement again.
Thanks for your suggestions.
Bart gave excellent advice. A grand is a lot for anyone to drop on what you can make yourself for one-tenth or so of that cost. You can get suitable raw material from building centers, McMaster-Carr, etc and experiment very inexpensively. It does not need to be audiophile approved to be effective. You will be very pleased with the results, if not the appearance. Your room (and most others) looks like it could really use some basic stuff such as a couple bass traps and absorptive panels on the walls or ceiling.
Peace,
Tom E
Barttc is exactly correct! Experiment with (relatively) inexpensive absorption and diffusion methods before investing large sums of money in commercial products. For less then $500 I completely treated my home theater and made huge improvements in the sound. Search the web and you will find a wealth of information and ideas. Good luck!
You might consider DIY. There are lots of things you can experiment with cheaply, then buy the high priced spread when you know what you need.
For example, if you think you need sub traps (so many rooms do), buy a few round bales of ordinary fiberglass insulation at about $10 each (returnable to most stores), and try out the concept. Sure, this won't get you beyond 60-70% effectiveness, but that's a lot and will tell you a lot. Then buy the big stuff if you need it.
Look up the DIY designs. You don't have to build a tower to your power, you know. You can experiment cheaply with a variety of readily available absorbers and diffusers first. I built my room lens clones for about $25 for a pair and they worked very very very well! I could have mocked up a less effective facsimile more easily for less too.
I don't doubt that the commercial stuff is more effective. How far that goes, I don't really know.
Every room is different. There are a few popular and effective routes, not simply one, you know...
Thanks for the suggestion about the DIY absorbers. I was considering that in the past; however, thought the commercially bought ones were a lot more effective. I might be wrong in this. Also, when I priced fiberglass rolls, they were quite expensive, as I recall, and the materials alone probably would have cost nearly as much as the GIK stuff.
I might have looked at the wrong packages of fiberglass, though. Here's a question, if you leave the stuff in its plastic bag, does it work the same, or does the plastic keep it from working properlty?
He did all the spadework and is very informative.
Seems that the plastic does NOT affect low freqs in any significant way, but DOES affect mids and HF. So for quick and dirty check on bass trapping, I simply left mine in the bags and never looked back (nor felt the need to do more than this either).
Some of the commercial absorbers use Corning or other compressed fiberglass as their base or total mass. So if that's what they're doing and you buy them at not much more than constructing your own, then you might as well go commercial, especially if they have a generous return policy.
But you can check various methods with cheap DIYs, not simply fiberglass batting or panels, for most diffusion, diffraction and absorptive functions. You can also use that to see how much, how many, and where you might want various devices. Then go for the well made commercial stuff confident that you spent your money for real results you'll appreciate.
FWIW, the biggest component of any stereo system is your room. No kidding, you really need to deal with that or you'll never know how good your equipment can actually sound!
Thanks for the info. I'm thinkin' I've got a project (or two) awaiting me this weekend. I'll have to swing by Home Depot tomorrow after work to have a little looksie.
Thanks again.
I would agree that most room treatments will do nothing in your room. I face a worse circumstance in my summer home with a 10 by 13 room. I know I am going to have much experimentation ahead of me. I would move your record rack into the corner beside the left speaker rather than leaving this cavity to raise the bass boom.
I was hoping that the record rack would help the room out. The way it's set up now, there isn't room to place it next to the left speaker. Thanks for the suggestion, though. I may have to rearrange (though I'd rather not).
...to see what they recommend.
Thanks for the suggestion.
Post a Followup:
| FAQ |
Post a Message! |
Forgot Password? |
|
||||||||||||||
|
||||||||||||||
This post is made possible by the generous support of people like you and our sponsors:


